In the world of food preservation, few tools offer the efficiency and protection of a chamber vacuum sealer. These powerful machines extend the shelf life of everything from delicate pastries to hearty cuts of meat, lock in flavor, and prevent freezer burn with unparalleled precision. But like any high-performance appliance, a chamber vacuum sealer requires diligent care to consistently deliver optimal results and stand the test of time. Neglecting its upkeep can lead to inefficient operation, premature wear, and even costly repairs, undermining the very benefits you sought.
This comprehensive guide is crafted to empower you with the knowledge and practical tips needed to maintain your chamber vacuum sealer effectively. Whether you’re a home user passionate about preserving your harvests or a professional relying on it daily, understanding the nuances of cleaning, inspecting, and servicing your machine is paramount. We’ll delve into the fundamental principles of these sealers, explore crucial maintenance routines, troubleshoot common issues, and ensure your investment continues to protect your food for years to come.
What Are Chamber Vacuum Sealers? Why Do You Need One?
A chamber vacuum sealer is a sophisticated device designed to remove air from packaging, creating a vacuum seal that significantly extends food freshness. Unlike external suction sealers that pull air directly from a bag, a chamber sealer encloses the entire bag and its contents within a chamber. The machine then evacuates all the air from this chamber, equalizing the pressure inside and outside the bag. This unique process allows liquids and delicate foods to be vacuum-sealed without being crushed or sucked out, making them ideal for sous vide cooking, marinating, and preserving items with high moisture content.
The benefits of using a chamber vacuum sealer are extensive. Firstly, by eliminating oxygen, it dramatically prolongs the shelf life of food, often by several months or even years in the freezer. Secondly, it prevents freezer burn, a common issue that degrades taste and texture. Thirdly, vacuum sealing retains essential nutrients, flavors, and aromas, ensuring your food tastes as fresh as the day it was sealed. This oxygen-free environment also inhibits the growth of spoilage bacteria and mold, enhancing food safety. Beyond food, these versatile machines can protect valuable documents from moisture, preserve silver from tarnishing, or even compress clothing for efficient storage.
Types of Popular Vacuum Sealers
Understanding the different types of vacuum sealers available helps appreciate the unique advantages of a chamber model. Each type caters to specific needs, balancing performance with convenience and cost.
- Handheld Vacuum Sealers: These compact, battery-operated devices are designed for quick, small-scale tasks. They are incredibly portable and typically work with specialized zipper bags or containers.
- Pros: Extremely small, easy to store, affordable, simple for quick seals.
- Cons: Limited suction power, only suitable for small items, not ideal for liquids, often require proprietary bags.
- External Suction Vacuum Sealers: The most common type for home use, these machines draw air directly out of a bag through a vacuum channel. The bag’s open end is placed over a sealing bar and vacuum port, and once air is removed, the bag is heat-sealed.
- Pros: Generally more powerful than handheld units, wider availability, suitable for dry goods and some solid foods, relatively affordable.
- Cons: Cannot effectively seal liquids or moist foods without special techniques or accessories, delicate items can be crushed, bags must be placed perfectly.
- Chamber Vacuum Sealers: As discussed, these seal the entire item within a chamber, equalizing pressure.
- Pros: Superior for liquids, moist foods, and delicate items; stronger, more consistent seals; typically more durable and built for heavier use; ideal for sous vide.
- Cons: Larger footprint, significantly higher initial cost, heavier, and less portable.
Comparison Table of Vacuum Sealer Types
Choosing the right vacuum sealer depends on your specific needs, usage frequency, and the types of food you intend to preserve. This table highlights key differences between common vacuum sealer types.
| Feature | Handheld Vacuum Sealer | External Suction Vacuum Sealer | Chamber Vacuum Sealer |
|---|---|---|---|
| Primary Use | Quick seals, small items | Dry goods, solid foods | Liquids, moist foods, delicate items |
| Vacuum Method | Air sucked from bag/container | Air sucked from bag | Air removed from entire chamber |
| Liquid Sealing | Limited, only with special items | Difficult, often requires pre-freezing | Excellent, no risk of drawing liquids out |
| Food Crushing | Low | Moderate to High | Very Low (pressure equalization) |
| Size | Very compact | Compact to medium | Large, heavy |
| Cost | Low | Medium | High |
| Durability | Basic | Good | Excellent, built for heavy-duty use |
| Typical User | Casual, travel, small portions | Home cook, everyday storage | Serious home cook, small business, hunters |
How to Choose the Right Vacuum Sealer
Selecting the perfect vacuum sealer involves a careful assessment of your needs and priorities. For chamber vacuum sealers, in particular, the investment warrants thorough consideration.
- Usage Needs: Begin by evaluating what you’ll be sealing. If liquids, marinades, or delicate items are a priority, a chamber sealer is indispensable. For occasional sealing of dry goods, an external suction model might suffice. Consider the volume of food; frequent, large-batch sealing warrants a robust machine.
- Budget: Chamber vacuum sealers represent a significant investment compared to other types. Determine your comfortable spending range, but remember that durability and performance often correlate with price. A more expensive chamber sealer might offer better long-term value through extended lifespan and consistent results.
- Size and Design: Chamber sealers are substantial. Measure your available counter or storage space to ensure the machine fits comfortably. Consider its weight if you plan to move it frequently.
- Power and Pressure: Look for specifications like vacuum pressure (often measured in inches of mercury or mbar) and pump speed. Higher power means quicker, more complete vacuum cycles, which is especially important for busy kitchens.
- Additional Features: Modern sealers offer various conveniences.
- Seal bar length: Longer bars accommodate wider bags.
- Double seal bars: Provide an extra layer of security for critical items.
- Marinating functions: Speed up the marinating process.
- Gas flush: For delicate items that need protection from crushing, where oxygen is replaced with inert gas.
- Digital controls: Offer precise control over vacuum and seal times.
- Brand and Reliability: Research reputable brands known for quality and customer support. Reading user reviews and expert recommendations can provide insights into a model’s real-world performance and longevity. Investing in a trusted brand often means better build quality and easier access to parts and service. Always consult the manufacturer’s manual for specific operational and maintenance instructions.
Essential Maintenance Tips for Your Chamber Vacuum Sealer
Proper maintenance is the cornerstone of extending the lifespan and ensuring peak performance of your chamber vacuum sealer. Regular care prevents common issues, preserves food quality, and protects your investment.
Daily Care & Cleaning
After each use, especially when sealing moist or saucy foods, immediate cleaning is critical.
- Wipe Down the Chamber: Use a damp, soft cloth with a mild detergent and warm water to clean the entire chamber, paying close attention to corners and edges where food particles or liquids might accumulate. Avoid abrasive cleaners or harsh chemicals, which can damage surfaces. For stubborn smells, a solution of one part white vinegar to three parts water can sanitize effectively, or leave a bowl of baking soda in the chamber overnight to absorb odors.
- Clean the Seal Bars and Lid Gasket: Wipe the sealing bars and the lid gasket gently with a damp cloth to remove any residue. Food bits or moisture on these components can compromise future seals.
- Drip Tray: If your model has a detachable drip tray, remove and wash it with warm soapy water. Ensure all parts are thoroughly air-dried before reassembling to prevent mold and bacterial growth.
|
Our Picks for the Best Vacuum Sealer in 2026
As an Amazon Associate I earn from qualifying purchases.
|
||
| Num | Product | Action |
|---|---|---|
| 1 | FoodSaver Vacuum Sealer Machine, Automatic Bag Detection, Sous Vide Friendly, with sealer bags, roll, handheld vacuum sealer, black |

|
| 2 | FoodSaver PowerVac Compact Vacuum Sealing Machine Stainless Steel & Black Vertical Storage VS0150 | Preserves freshness reduces bag waste for both dry and wet food |
|
| 3 | 95kPa Precision Vacuum Sealer Machine, Double Heat Seal for Dry/Moist Food, Easy-Lock Handle, Built-in Bag Storage & Cutter, Progress Display, Pulse Mode, Removable Drip Tray, Silver |
|
| 4 | Anybear Vacuum Sealer Machine, 90kPa 120W Wide Seal All-IN-1 Powerful Food Storage, Build-in Cutter | Bags Storage | Digital Countdown Display | 2 Bag Rolls and 5pcs Pre-cut Bags (Gray) |
|
| 5 | NutriChef Food Vacuum Sealer Machine - Automatic Air Sealing System for Dry & Moist Foods, LED Touch Controls, Includes Vacuum Bags, Hose & Wine Stopper, High Suction Power, 14"x6"x3", Silver |
|
| 6 | Chef Preserve Compact Vacuum Sealer for Food (Vacuum Sealer Machine + 30 Reusable Vacuum Bags) Powerful Handheld Vacuum Sealer Machine, Seal Meal Saver, Portable Food Sealer |
|
| 7 | 90KPa Portable Vacuum Sealer Machine for Food, One-Touch Open Lid, Detachable & Easy to Clean, Vertical Placement Saves Space, Powerful Suction for Freezer Bags & Food Storage |
|
| 8 | Mesliese Vacuum Sealer Machine Powerful 90Kpa Precision 6-in-1 Compact Food Preservation System with Cutter, 2 Bag Rolls & 5 Pre-cut Bags, Widened 12mm Sealing Strip, Dry&Moist Modes (Silver) |
|
| 9 | Nesco Deluxe Food VS-12 Vacuum Sealer, 130 Watts, Kit Bags & Viewing Lid, Compact, Silver |
|
| 10 | Food Vacuum Sealer Machine, Powerful & Continuous Vacuum Sealing for Kitchen Storage & Meal Prep, Wet & Dry Food Sealing, Detachable Upper & Lower Design for Easy Cleaning, Includes 50 Bags |
|
Gasket Care
The lid gasket creates the airtight seal necessary for vacuuming. Its condition is paramount.
- Inspect Regularly: Frequently check the gasket for any signs of wear, cracks, tears, or brittleness. A damaged gasket is a primary cause of weak vacuums or sealing failures.
- Clean Gently: Wipe the gasket with a soft, damp cloth. Avoid stretching or pulling on it.
- Replace When Needed: If the gasket shows significant signs of deterioration, replace it promptly according to the manufacturer’s recommendations to maintain proper sealing integrity.
Seal Bar & Heating Element
The seal bar is responsible for creating the final, airtight seal on your bags.
- Inspect for Damage: Regularly examine the seal bar and its Teflon tape or covering for any wear, damage, or buildup of residue. A worn-out seal bar or tape can lead to inconsistent or failed seals.
- Clean Residue: Ensure the sealing area is free of any food particles or wrinkles on the bag. Use a cotton swab with soapy water for precise cleaning around the heating element.
- Replacement: Replace worn-out seal bars or tape as needed to maintain optimal sealing performance. For some models, calibrating seal time to match bag materials might also be necessary.
Vacuum Pump Maintenance (Oil-Based Models)
For chamber vacuum sealers with oil-based pumps, routine oil changes are critical for performance and longevity.
- Oil Change Frequency:
- Generally, change the oil every 250 cycles or every three to six months, whichever comes first.
- For light or intermittent use, some sources suggest annually or every 2,000 hours.
- Always refer to your specific machine’s manual for precise recommendations.
- Signs Oil Needs Changing: The oil should be clear. If it appears dark, cloudy, milky (indicating moisture contamination), or contains debris, it’s time for a change. Dirty oil reduces efficiency and can damage the pump.
- Oil Level Check: Regularly check the oil level using the sight glass or dipstick, adding specialized vacuum pump oil if it falls below the minimum line.
- Filter Replacement: Replace vacuum pump filters every three years or sooner if they become contaminated.
- Pump Conditioning Program: If your machine features a pump conditioning program, run it periodically to lubricate internal components and remove moisture, which can extend pump life.
“Routine oil pump care is crucial for strong vacuum pressure and a long-lasting machine. Neglecting oil changes can lead to reduced efficiency and costly downtime.” – VacMaster Maintenance Guide, emphasizing the importance of scheduled oil changes.
Proper Storage
How you store your vacuum sealer can significantly impact its longevity.
- Clean, Dry Location: Store the machine in a clean, dry area, away from direct sunlight, which can degrade plastic components.
- Good Ventilation: Ensure the storage area is well-ventilated to prevent dust and other foreign objects from entering the machine.
- Lid Ajar: If storing for an extended period, leave the lid slightly open. This allows air to circulate, preventing musty odors and pressure buildup on gaskets.
- Protective Cover: A dust cover can help keep internal parts free of debris, especially if the machine is used infrequently.
Preventing Overheating
Continuous operation without breaks can strain components.
- Allow Cooldown Periods: Give your machine periodic breaks, especially if performing multiple sealing operations back-to-back. Excessive heat can reduce the effectiveness of the sealing bar and damage internal parts.
- Ensure Good Ventilation: Make sure the machine’s vents are not blocked during use to allow proper airflow and prevent overheating.
Using Quality Materials
The quality of your bags impacts both the seal and the machine’s workload.
- Appropriate Bags: Use vacuum sealer bags designed for your machine, especially those from reputable manufacturers. Thicker, quality bags are less prone to punctures and help achieve more consistent results.
- Avoid Overfilling: Leave at least 5cm of space at the top of the bag to ensure a proper, strong seal.
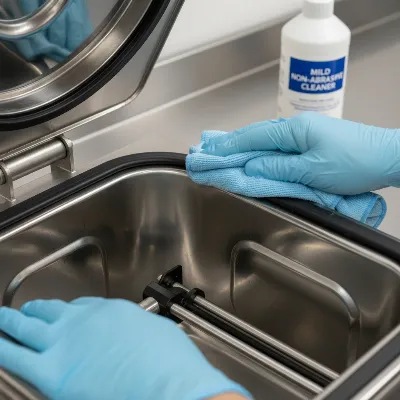 A person wiping down the stainless steel chamber of a vacuum sealer with a soft cloth, focusing on the seal bar and gasket area, with a bottle of mild cleaner nearby. Maintain the clean, professional look of a kitchen environment.
Common Issues and How to Troubleshoot Them
Even with diligent maintenance, issues can occasionally arise. Knowing how to diagnose and address common problems can save you time and prevent unnecessary service calls.
Machine Not Removing Air Properly (Weak Vacuum)
This is a frequent complaint, often stemming from simple causes.
- Blocked Vacuum Pump or Air Intake: Inspect the vacuum pump and air intake ports for any debris, crumbs, or foreign objects that might be obstructing airflow. Clean as needed with a cotton swab or toothpick.
- Leaky Bag: Ensure the vacuum bag is free of holes, tears, or creases along the sealing area. Always use new, high-quality bags, and ensure they lie flat without wrinkles.
- Improper Bag Placement: The open end of the bag must be correctly and flatly positioned within the chamber and over the sealing bar. Ensure at least 5cm of space from the top of the bag.
- Worn-Out Gaskets: Inspect the lid gasket for any signs of wear, cracks, or hardening. A brittle or damaged gasket will prevent a proper seal, allowing air to leak in. Replace worn gaskets promptly.
- Dirty Oil (Oil-Based Pumps): If your oil-based pump’s oil is dark, milky, or sludgy, it won’t create an efficient vacuum. Change the oil following your manual’s instructions.
- Chamber Leak: If none of the above resolve the issue, perform a leak test (often described in your manual) to check for air leaks within the chamber itself, possibly requiring professional service.
Machine Not Sealing the Bag
If the vacuum process completes but the bag doesn’t seal, or the seal is weak.
- Damaged Heating Element or Sealing Strip: Inspect the heating strip and its Teflon covering for damage, dirt, or signs of wear. A burnt-out element or compromised strip will fail to create a proper seal. Replace if worn out.
- Incorrect Sealing Time/Temperature Settings: Adjust the sealing time or temperature settings, especially for thicker bags or different bag materials. Refer to your manual for recommended settings.
- Incompatible or Low-Quality Bags: Always use bags compatible with your vacuum sealer model and ensure they are of good quality.
- Dirty Seal Bar: Residue on the seal bar can prevent a clean seal. Wipe it down thoroughly with a damp cloth.
Machine Not Turning On
A machine that won’t power up can be frustrating.
- Power Source: Confirm the machine is securely plugged into a functional power outlet. Test the outlet with another appliance.
- Faulty Power Cord: Inspect the power cord for any damage or loose connections.
- Blown Fuse or Tripped Circuit Breaker: Check your home’s circuit breaker or the machine’s internal fuse (if accessible and safe to inspect per manual).
- Internal Electrical Issue: If basic checks don’t resolve the problem, there might be an internal electrical fault, requiring professional assistance.
Overheating During Use
If the machine becomes excessively hot or shuts down mid-cycle.
- Continuous Use: Vacuum sealers, especially external models, can overheat with continuous, back-to-back cycles. Allow the machine to cool down between uses, particularly after sealing many items.
- Restricted Airflow: Ensure the machine is in a well-ventilated area and that no vents are blocked, which can lead to heat buildup.
- Faulty Cooling System: In rare cases, a faulty cooling fan or system could be the cause, requiring professional inspection.
Excessive Noise During Operation
While some noise is normal, unusually loud or grinding sounds can indicate an issue.
- Loose Internal Components: Unplug the machine and, if safe and accessible per the manual, check for any loose internal parts that might be vibrating.
- Worn-Out Vacuum Pump: A vacuum pump nearing the end of its life, or one with contaminated oil, can become noisy. Regular oil changes and maintenance can prevent this.
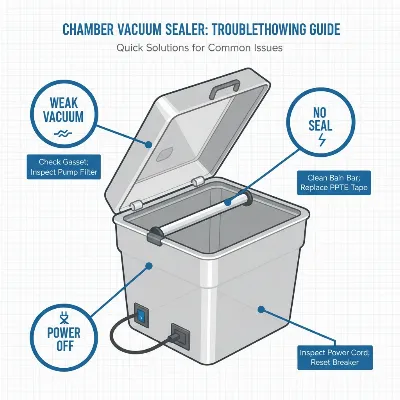 An infographic or diagram showing common vacuum sealer problems like weak seal, no power, and overheating, with simple visual troubleshooting steps and solutions. A clean, illustrative style.
Conclusion
A chamber vacuum sealer is an invaluable asset for anyone serious about preserving food and extending its shelf life. From safeguarding delicate ingredients for sous vide to preventing freezer burn on bulk purchases, its capabilities are unmatched. However, the true power and longevity of these machines are unlocked through consistent and attentive maintenance.
By prioritizing regular cleaning of the chamber, seal bars, and gaskets, performing timely oil changes on oil-based pumps, and addressing minor issues promptly, you can ensure your vacuum sealer operates at peak efficiency for many years. These simple yet crucial steps not only preserve your food but also protect your investment, preventing costly repairs and extending the life of your appliance. Make these maintenance routines a regular part of your kitchen habits, and your chamber vacuum sealer will continue to be a reliable partner in your culinary adventures.
What steps will you take today to ensure your chamber vacuum sealer continues to deliver perfect seals and fresh food for years to come?
Frequently Asked Questions
How often should I clean my chamber vacuum sealer?
You should clean your chamber vacuum sealer after every use, especially if sealing liquids or moist foods. A quick wipe-down of the chamber, seal bars, and gasket is usually sufficient for daily care. Deeper cleaning, including removable parts and odor control, can be done every few uses or as needed.
What are the signs that my chamber vacuum sealer’s oil needs changing?
For oil-based pumps, signs include the oil appearing dark, cloudy, or milky (indicating moisture contamination), or if it contains visible debris. You might also notice a decrease in vacuum performance, such as slower vacuum cycles or an inability to achieve a strong vacuum.
Can I use any type of oil for my chamber vacuum sealer’s pump?
No, it is crucial to use only the specific type of vacuum pump oil recommended by your manufacturer. Using the wrong type of oil can lead to poor performance, damage the pump, and void your warranty. Always consult your machine’s manual for the correct oil specifications.
Why is my chamber vacuum sealer not getting a good vacuum?
A weak vacuum can be caused by several factors, including a dirty or damaged lid gasket, blockages in the vacuum pump or air intake, a leaky vacuum bag, or contaminated oil in oil-based pumps. Ensure the bag is properly placed and inspect all components for wear or obstruction.
How can I prevent my chamber vacuum sealer from overheating?
To prevent overheating, avoid running continuous sealing cycles without breaks. Allow the machine to cool down between batches, especially during heavy use. Also, ensure the vacuum sealer is placed in a well-ventilated area, and its air vents are not blocked during operation.