A lingering, unpleasant odor from your vacuum sealer can turn food preservation from a convenience into a kitchen nuisance. Whether it’s the faint scent of yesterday’s garlic or a more persistent, unidentifiable funk, a smelly vacuum sealer isn’t just off-putting; it can compromise the freshness of your food and even indicate underlying issues. But don’t worry, restoring your machine to its pristine, fresh-smelling glory is simpler than you might think. This comprehensive guide will walk you through identifying the root causes of those unwelcome smells, equipping you with the right tools and safe, DIY cleaning solutions, and showing you step-by-step how to clean and maintain your vacuum sealer to ensure it keeps your food fresh and your kitchen odor-free.
What is a Vacuum Sealer? Why Do You Need One?
A vacuum sealer is a kitchen appliance designed to remove air from a bag or container, creating an airtight seal. This process, known as reduced oxygen packaging, significantly extends the shelf life of various foods by preventing oxidation and inhibiting the growth of spoilage-causing bacteria and mold. Beyond preserving food, vacuum sealing also safeguards against freezer burn, maintains food’s original flavor and nutritional value, and helps organize your pantry and freezer more efficiently. From marinating meats faster to protecting important documents or valuable items from moisture, a vacuum sealer is a versatile tool that extends far beyond just food storage.
Common Causes of Vacuum Sealer Odors
If your vacuum sealer is emitting an unpleasant smell, it’s usually a sign of accumulated residue or improper maintenance. The primary culprit is often food particles and liquids that get sucked into the vacuum channel, seep into the drip tray, or cling to the sealing bar and gaskets. Over time, these organic materials can decompose, fostering bacterial growth that produces foul odors. Strong-smelling foods, like fish, garlic, or onions, can also leave behind pervasive scents that permeate the plastic and rubber components of your machine. Furthermore, inadequate drying after cleaning can trap moisture, creating a breeding ground for mold and mildew, leading to musty or stale smells. Infrequent cleaning allows these issues to compound, making odors more stubborn and harder to eliminate.
 A sparkling clean vacuum sealer with various vacuum-sealed fresh foods like vegetables and meat laid out aesthetically in a modern kitchen setting.
Essential Tools and Safe Cleaning Solutions
Tackling vacuum sealer odors effectively requires the right set of tools and gentle, yet powerful, cleaning agents that won’t damage your appliance. You likely have most of these items already in your home:
- Microfiber cloths (lint-free): Ideal for wiping surfaces without leaving fibers or scratches.
- Cotton swabs or Q-tips: Perfect for reaching into tight crevices and small spaces.
- Soft brush or old toothbrush: Excellent for scrubbing away stubborn residue from gaskets and textured surfaces.
- Mild dish soap: Mixed with warm water, it forms a gentle solution for general cleaning.
- White vinegar: A natural deodorizer and disinfectant. Use it diluted (1:1 or 1:3 vinegar to water) for effective sanitization and odor neutralization, especially for stubborn smells.
- Isopropyl alcohol (rubbing alcohol): Can be used on a microfiber cloth for sanitizing and removing tough grease from non-rubber parts, but avoid direct contact with rubber gaskets as it can cause them to dry out.
- Baking soda: An excellent natural odor absorber.
Important Note: Always avoid harsh chemical cleaners, abrasive scrubbers, or bleach. These can damage the plastic, rubber gaskets, or internal components of your vacuum sealer, potentially compromising its sealing ability and even contaminating your food.
Step-by-Step Guide: Cleaning Your Smelly Vacuum Sealer
Ready to banish those odors? Follow these steps for a safe and effective deep clean:
1. Safety First: Unplug and Cool Down
|
Our Picks for the Best Vacuum Sealer in 2026
As an Amazon Associate I earn from qualifying purchases.
|
||
| Num | Product | Action |
|---|---|---|
| 1 | Chef Preserve Compact Vacuum Sealer for Food (Vacuum Sealer Machine + 30 Reusable Vacuum Bags) Powerful Handheld Vacuum Sealer Machine, Seal Meal Saver, Portable Food Sealer |

|
| 2 | 90KPa Portable Vacuum Sealer Machine for Food, One-Touch Open Lid, Detachable & Easy to Clean, Vertical Placement Saves Space, Powerful Suction for Freezer Bags & Food Storage |
|
| 3 | Mesliese Vacuum Sealer Machine Powerful 90Kpa Precision 6-in-1 Compact Food Preservation System with Cutter, 2 Bag Rolls & 5 Pre-cut Bags, Widened 12mm Sealing Strip, Dry&Moist Modes (Silver) |
|
| 4 | NutriChef Food Vacuum Sealer Machine - Automatic Air Sealing System for Dry & Moist Foods, LED Touch Controls, Includes Vacuum Bags, Hose & Wine Stopper, High Suction Power, 14"x6"x3", Silver |
|
| 5 | 95kPa Precision Vacuum Sealer Machine, Double Heat Seal for Dry/Moist Food, Easy-Lock Handle, Built-in Bag Storage & Cutter, Progress Display, Pulse Mode, Removable Drip Tray, Silver |
|
| 6 | Food Vacuum Sealer Machine, Powerful & Continuous Vacuum Sealing for Kitchen Storage & Meal Prep, Wet & Dry Food Sealing, Detachable Upper & Lower Design for Easy Cleaning, Includes 50 Bags |
|
| 7 | FoodSaver PowerVac Compact Vacuum Sealing Machine Stainless Steel & Black Vertical Storage VS0150 | Preserves freshness reduces bag waste for both dry and wet food |
|
| 8 | Nesco Deluxe Food VS-12 Vacuum Sealer, 130 Watts, Kit Bags & Viewing Lid, Compact, Silver |
|
| 9 | FoodSaver Vacuum Sealer Machine, Automatic Bag Detection, Sous Vide Friendly, with sealer bags, roll, handheld vacuum sealer, black |
|
| 10 | Anybear Vacuum Sealer Machine, 90kPa 120W Wide Seal All-IN-1 Powerful Food Storage, Build-in Cutter | Bags Storage | Digital Countdown Display | 2 Bag Rolls and 5pcs Pre-cut Bags (Gray) |
|
Before you touch anything, always unplug your vacuum sealer from the power outlet. This crucial step prevents electrical accidents. If you’ve just used the machine, allow it to cool down completely for about 10-15 minutes, especially the heat-sealing bar, to avoid burns.
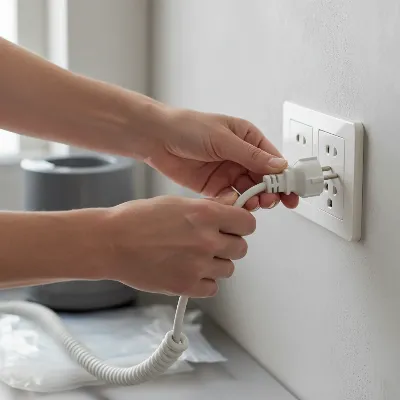 A person's hands safely unplugging a vacuum sealer from a wall outlet before cleaning, emphasizing safety.
2. Disassemble Removable Parts
Carefully remove any detachable components, such as the drip tray (if your model has one) and the foam gaskets. Refer to your user manual if you’re unsure how to remove them safely.
3. Wipe Down the Exterior
Dampen a microfiber cloth with warm, soapy water (using mild dish soap). Wring it out thoroughly so it’s not dripping wet. Gently wipe down all exterior surfaces of your vacuum sealer, paying close attention to buttons, control panels, and around the lid where fingerprints and food splatters might accumulate.
4. Clean the Seal Bar and Vacuum Channel
This area is often the main source of odors. Dampen a clean microfiber cloth with warm, soapy water. Carefully wipe the heat-sealing bar and the vacuum channel (the trough where air is extracted). For tight corners and stubborn residue around the sealing strip, use a cotton swab dipped in soapy water. Be gentle around the heat strip to avoid damage. Food residue here can lead to weak seals and strange smells.
5. Deep Clean the Drip Tray
If your vacuum sealer has a removable drip tray, this is a notorious spot for liquid spills and bacterial growth. Soak the drip tray in a solution of equal parts white vinegar and warm water for about 5-10 minutes. Use a soft brush or old toothbrush to scrub away any stuck-on food or residue. Rinse thoroughly under warm running water and dry completely.
6. Clean and Inspect Gaskets
The rubber or foam gaskets are vital for an airtight seal and can harbor odors. Gently remove them if possible (check your manual). Wash them with warm, soapy water and use a soft brush or cotton swab to clean any grooves or crevices. Alternatively, wipe them down with a diluted white vinegar solution. Inspect the gaskets for any signs of wear, cracks, hardening, or discoloration. If they appear damaged or still retain a strong odor after cleaning, it might be time for a replacement.
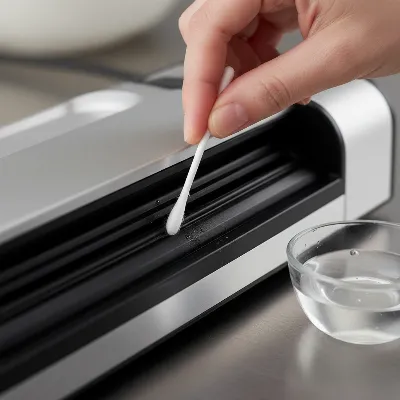 A close-up of a hand using a cotton swab to meticulously clean the gasket of a vacuum sealer with a diluted cleaning solution.
7. Sanitize for Stubborn Smells
For persistent odors or to deep-sanitize, you can wipe down the vacuum chamber (excluding power ports and delicate electrical parts) and the seal bar with a cloth dampened with a 1:1 white vinegar and water solution. For non-rubber plastic components, a microfiber cloth lightly dabbed with isopropyl alcohol can also be effective, but ensure to dry immediately and avoid direct contact with rubber.
8. Internal Odor Removal (for liquids sucked into the pump)
If liquids have been accidentally sucked into the vacuum pump and are causing an odor, a specific method can help. Place about 2 tablespoons of warm water and a few drops of white vinegar into a pre-cut vacuum bag. Position the bag in the trough, close the lid, and run a normal vacuum cycle. This allows the warm, vinegary water to be drawn into the machine, flushing out residual odors. Repeat 2-3 times with just air (no bag) afterward to ensure all water exits the exhaust and the system dries out.
9. Dry Thoroughly
This step is critical to prevent mold and mildew. After cleaning, wipe all parts dry with a clean, dry cloth. Then, allow all components to air dry completely before reassembling your vacuum sealer. Leave the lid slightly open during air drying to ensure proper air circulation, which helps moisture evaporate fully. You can use a cool setting on a hairdryer to speed up the process if needed.
 A vacuum sealer sitting on a kitchen counter with its lid slightly ajar, air-drying after cleaning to prevent mold and odors.
Preventing Future Odors: Best Practices
Regular cleaning is the best defense against a smelly vacuum sealer, but consistent habits can prevent odors from developing in the first place.
- Clean After Every Use: Make it a habit to quickly wipe down the seal bar and vacuum channel after each use, especially when sealing messy or moist foods.
- Store with Lid Slightly Open: When not in use, storing your vacuum sealer with the lid slightly ajar promotes air circulation, preventing musty smells and protecting the gasket from compression.
- Ensure Thorough Drying: Always allow all parts to dry completely before reassembling and storing. Trapped moisture is an odor magnet.
- Use Odor Absorbers: For long-term storage or stubborn lingering smells, you can place a small open bowl of baking soda or a few activated charcoal packs inside the vacuum chamber overnight to absorb odors naturally.
- Replace Worn Gaskets: Regularly inspect your gaskets. If they show signs of wear, cracks, or if they’ve absorbed strong odors that can’t be cleaned, replace them to maintain an airtight seal and prevent future smells.
- Avoid Overfilling Bags: This helps prevent liquids or food particles from being sucked into the vacuum chamber.
Troubleshooting Common Odor Issues
Even with regular cleaning, you might encounter specific odor challenges.
- Lingering Food Smells: If a stubborn food odor persists after a deep clean, try wiping the affected areas again with a stronger white vinegar solution (2:1 vinegar to water). You can also leave a small bowl of baking soda or activated charcoal in the closed vacuum chamber overnight to absorb residual smells. If the gasket is old and porous, it might have absorbed the odor permanently, indicating it’s time for a replacement.
- Burnt Smell: A burning smell usually indicates residue on the heat-sealing bar that is scorching during operation. Immediately unplug the machine, let it cool, and carefully clean the seal bar with a cloth dampened with white vinegar to remove any burnt-on debris. Ensure no plastic from bags is melted onto the strip.
> “Preventative cleaning is paramount. A quick wipe down after each use with a mild, food-safe cleaner can save you from deeper, more time-consuming odor problems down the line.” – Sarah Chen, Food Preservation Expert at FreshSeal Technologies
Conclusion
Keeping your vacuum sealer clean is not just about aesthetics; it’s fundamental to food safety, efficient operation, and extending the lifespan of your appliance. By understanding the common causes of odors and implementing a routine of thorough cleaning with safe, accessible household products like mild dish soap and white vinegar, you can easily maintain a fresh and functional vacuum sealer. Remember the importance of drying all components completely and storing your machine properly with the lid slightly ajar. Consistent maintenance ensures your vacuum sealer continues to provide optimal food preservation, protecting your meals from spoilage and your kitchen from unwelcome smells.
What’s the most challenging food smell you’ve had to remove from your vacuum sealer?
Câu Hỏi Thường Gặp
How often should I clean my vacuum sealer?
The frequency depends on your usage. For light use (1-2 times a month), clean it every 5 uses. If you use it frequently or with messy/moist foods, it’s best to perform a quick wipe-down after each use and a deeper clean weekly to prevent odor buildup and maintain optimal performance.
Can I use bleach to clean my vacuum sealer?
No, it is strongly advised not to use bleach or other harsh chemical cleaners on your vacuum sealer. These chemicals can corrode rubber gaskets, damage plastic components, and leave behind residues that could contaminate food, compromising both the machine’s functionality and food safety. Stick to mild dish soap, white vinegar, or isopropyl alcohol for safe and effective cleaning.
What if my vacuum sealer smells burnt?
A burnt smell typically indicates food residue or plastic melted onto the heat-sealing bar. Immediately unplug the vacuum sealer and let it cool down. Carefully inspect the sealing bar for any visible debris. Gently wipe the affected area with a cloth dampened with white vinegar to remove the burnt residue. Never operate a machine with a persistent burning smell without cleaning it first.
Why is thorough drying so important after cleaning?
Thorough drying is crucial because trapped moisture creates an ideal environment for mold, mildew, and bacteria to grow, which are primary sources of unpleasant odors. Leaving parts damp can also affect the sealing ability of gaskets and potentially damage electrical components. Always air dry all removable parts completely, and leave the sealer lid open until fully dry.