Imagine the frustration: you’ve meticulously prepared and vacuum-sealed your food, only to find the bag puffed up and the seal broken hours or days later. It’s a common issue that undermines the very purpose of vacuum sealing – preserving freshness and preventing freezer burn. Whether you’re a seasoned home cook or new to food preservation, a popped vacuum seal can lead to wasted food and a lot of disappointment. This guide will walk you through the essential techniques, clever DIY hacks, and troubleshooting tips to ensure your vacuum sealer bags stay perfectly sealed, protecting your culinary efforts and maximizing food longevity.
What Causes Vacuum Sealer Bags to Lose Their Seal?
Understanding why vacuum sealer bags fail is the first step toward preventing future issues. Several factors can compromise the integrity of a vacuum seal, turning your carefully preserved food into a potential victim of spoilage.
One of the most frequent culprits is contamination of the sealing area. Any moisture, food particles, grease, or even tiny wrinkles on the bag’s opening can prevent the heat seal from forming a complete, airtight bond. Think of it like trying to glue two surfaces together with dirt in between – it simply won’t stick properly.
Punctures and tears are another significant cause of seal failure. Foods with sharp edges, such as bones in meat, hard pasta, or even rigid vegetable stalks, can pierce the plastic bag either during the vacuuming process when pressure is intense, or later during storage if the bag shifts or is jostled. Thin, low-quality bags are particularly susceptible to this kind of damage.
Overfilling the bag also puts undue stress on the seal. When you pack too much food into a bag, it leaves insufficient space for the machine to create a robust, flat seal. The contents can push against the sealing area, causing wrinkles or making it difficult for the heat bar to properly fuse the plastic.
Certain “self-breathing” foods, like fresh fruits and vegetables (e.g., broccoli, cabbage, corn), continue to respire and release gases even after being sealed. This natural process can cause vacuum bags to slowly inflate over time, breaking the vacuum. Similarly, liquid vaporization from high-water-content foods stored at room temperature can create internal pressure, leading to bag expansion.
Finally, machine-related issues can be at fault. Worn-out gaskets that prevent proper suction, a dirty or damaged sealing bar that can’t generate adequate heat, or even an overheated machine from continuous use can all contribute to weak or failed seals. Ensuring your machine is in good working order is as crucial as proper bag preparation.
Essential Preparation for a Perfect Seal
Achieving a durable vacuum seal starts long before you press the “seal” button. Meticulous preparation of both your food and the vacuum bag itself is paramount.
First and foremost, cleanliness is key for the bag opening. Before sealing, ensure the inside and outside of the bag’s sealing area (the strip where the machine creates the bond) is absolutely dry and free from any food debris, liquids, or grease. Even a tiny crumb can compromise the seal. You can use a paper towel to wipe down the inside edges to guarantee a pristine surface.
A highly effective technique to keep the sealing area clean during filling is cuffing the bag. Fold the top edge of the bag (about 1-2 inches) back over itself before you start adding food. This creates a protective cuff that prevents food particles or liquids from accidentally touching the critical sealing zone. Once the bag is filled, simply unfold the cuff, and your sealing area will be clean and ready.
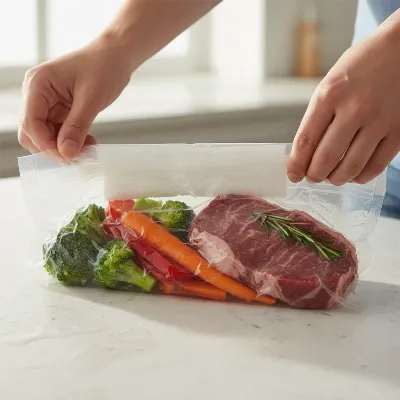 A person demonstrating cuffing a vacuum sealer bag to keep the sealing edge clean while filling food, in a kitchen setting.
Leaving adequate space at the top of the bag is also critical. Do not overfill your bags. Aim to leave at least 2-3 inches (5-8 cm) of empty space between the food and the top edge where the seal will be made. This provides enough room for the machine to draw out air effectively and create a strong, flat seal without food interfering. It also allows for potential double-sealing later.
For foods with high moisture content or liquids, cooling or pre-freezing can make a significant difference. If you’re sealing warm foods, allow them to cool completely to room temperature or even chill them in the refrigerator first. Warm foods release steam, which can introduce moisture into the sealing area. For liquids or very moist items, consider freezing them partially (1-2 hours) until solid before sealing. This prevents liquids from being drawn into the vacuum sealer’s chamber, which can damage the machine and ruin the seal.
DIY Hacks to Reinforce Your Vacuum Seals
Even with careful preparation, some situations call for extra reinforcement to guarantee your vacuum seals hold. Fortunately, there are several clever DIY hacks you can employ.
One of the most reliable methods is double sealing. After your vacuum sealer creates its initial seal, simply move the bag a quarter to a half-inch below the first seal and run the sealing cycle again. This creates a second, redundant seal, significantly increasing the chances that your bag will remain airtight, especially for long-term storage or delicate items. It’s a quick and easy step that provides immense peace of mind.
For items with sharp edges, such as T-bone steaks, ribs, chicken bones, dry pasta, or even certain frozen blocks of food, protection is paramount. These sharp points can easily puncture a vacuum bag, leading to air leakage. A simple yet effective hack is to wrap the sharp edges in a small piece of paper towel, parchment paper, or even a scrap piece of a vacuum sealer bag before placing the item in the bag. This provides a soft buffer, preventing the sharp points from piercing the plastic.
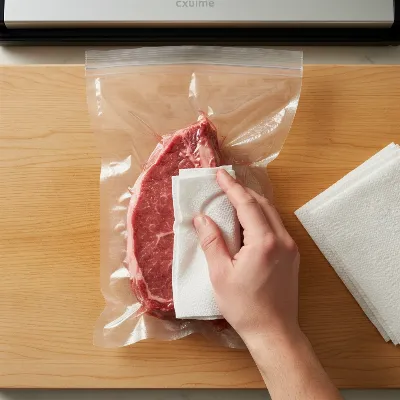 A close-up of sharp food items like bone-in meat being wrapped in a paper towel before being placed in a vacuum sealer bag to prevent punctures, in a domestic kitchen setting.
Investing in higher quality bags might seem like a simple tip, but it’s a crucial DIY choice. Thinner, cheaper bags are more prone to tearing, punctures, and simply failing to hold a seal over time. Opt for thicker, more durable vacuum sealer bags from reputable brands. While they might cost a little more upfront, they can save you money in the long run by preventing food spoilage and the frustration of re-sealing. Ensure the bags you choose are compatible with your specific vacuum sealer model, especially if it’s an external clamp style which usually requires textured bags.
Lastly, during the sealing process itself, you can provide manual assistance. As the machine begins to vacuum, gently smooth out any remaining wrinkles in the bag’s opening with your fingers. This ensures the plastic lays perfectly flat against the sealing bar, creating an optimal surface for the heat to fuse the plastic evenly and securely.
Troubleshooting Common Vacuum Sealer Machine Issues
Sometimes, the problem isn’t with the bag or your technique, but with the vacuum sealer machine itself. Regular maintenance and knowing how to troubleshoot common issues can save your seals and extend the life of your appliance.
The sealing bar is the heart of your vacuum sealer’s heat-sealing function. If your seals are consistently weak or incomplete, inspect the sealing bar for any residue, melted plastic, or debris. A dirty sealing bar cannot create an even heat distribution. Use a damp cloth to clean the sealing bar gently after each use, especially if sealing moist or saucy foods. Ensure the machine is unplugged before cleaning.
Gaskets are rubber or foam rings that create an airtight seal between the machine’s lid and base, allowing the vacuum pump to extract air effectively. Over time, these gaskets can become brittle, cracked, or compressed, losing their ability to create a proper vacuum. If your machine struggles to pull a strong vacuum or air seems to be leaking, check and replace the gaskets if they show signs of wear. Replacement gaskets are typically inexpensive and easy to install, often making a huge difference in performance.
Ensuring proper bag alignment within the vacuum chamber is also vital. The open end of the bag must be placed completely flat and correctly positioned over the vacuum channel and under the sealing bar. If the bag is skewed, wrinkled, or not fully inserted, the machine won’t be able to remove all the air or create a consistent seal. Take an extra second to flatten and position the bag correctly before closing the lid.
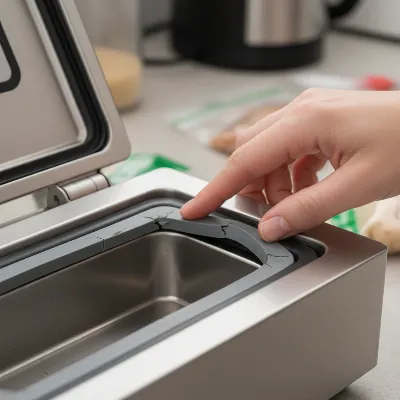 A close-up shot of a hand inspecting the rubber gasket of a vacuum sealer machine, checking for wear or cracks, emphasizing maintenance for a better seal.
Finally, allowing cooldown between uses is important for high-volume sealing. If you’re sealing many bags consecutively, the machine’s heating strip can overheat, which might lead to inconsistent or weak seals. Most machines have a built-in protection mode, but it’s good practice to allow your vacuum sealer to cool for about a minute between seals, especially if you notice the seals becoming less effective. This ensures the heating element maintains its optimal temperature for consistent results.
Advanced Tips for Long-Term Storage Success
For those serious about food preservation, incorporating advanced techniques can further enhance the longevity and reliability of your vacuum-sealed goods.
Understanding food respiration is critical for fresh produce. As mentioned, certain fruits and vegetables continue to release gases. For vegetables, a common advanced technique to mitigate this is blanching. Briefly immersing vegetables in boiling water followed by an ice bath before vacuum sealing deactivates enzymes that cause spoilage and gas production, ensuring the vacuum seal holds much longer.
The proper storage environment plays a significant role in maintaining the integrity of your vacuum seals. While vacuum sealing itself extends shelf life, where you store the sealed bags still matters. Dry goods, once sealed, should be kept in a cool, dark, and dry pantry. For high-moisture foods, refrigeration or freezing immediately after sealing is essential to prevent internal moisture from vaporizing and putting pressure on the seal. Extreme temperature fluctuations can also stress the bag material and compromise the seal over time, so consistent storage temperatures are ideal.
Considering a chamber vacuum sealer might be an “advanced” DIY step for some. While external clamp sealers are common and efficient for most home users, chamber sealers operate differently. They vacuum the entire chamber, not just the bag, which allows them to seal liquids without pre-freezing and are generally more robust. If you frequently seal liquids or large quantities, a chamber sealer could be a long-term investment that eliminates many common sealing issues. However, they are typically larger and more expensive.
> “The secret to enduring food preservation with vacuum sealing lies not just in the initial seal, but in understanding the science of your food and maintaining an optimal storage environment. A little extra care goes a long way in preventing spoilage.” – Dr. Elena Petrova, Food Science Expert
When to Replace Your Vacuum Sealer Bags (and Machine Parts)
Even with the best techniques, there comes a time when replacement is necessary. Recognizing these signs can prevent ongoing frustration and wasted food.
Signs of bag wear are usually obvious. If you notice visible cracks, small holes that reappear even after re-sealing, or if the plastic material itself feels thin, brittle, or stretched out, it’s time to replace the bag. Re-using vacuum sealer bags isn’t always advisable, especially if they’ve contained raw meats or have been punctured. For long-term storage, new, high-quality bags are always the best choice.
For your vacuum sealer machine, worn gaskets and sealing strips are the most common parts needing replacement. As discussed, gaskets can lose their elasticity and integrity, leading to air leaks. If your machine struggles to achieve a strong vacuum or requires you to press down excessively on the lid, inspect the gaskets. Similarly, the sealing strip (often covered by a Teflon tape) can wear out or become damaged. If you see discoloration, fraying, or if seals are consistently weak despite a clean bag, the sealing strip or the heating element underneath might need replacing. Most manufacturers offer replacement kits for these parts, allowing for easy home repair and extending the life of your appliance.
Conclusion
Keeping your vacuum sealer bags from popping open is a skill that combines careful preparation, smart techniques, and routine maintenance. By ensuring your bag openings are clean and dry, employing double seals, protecting sharp food items, and performing regular checks on your machine’s gaskets and sealing bar, you can dramatically improve the reliability of your vacuum seals. These DIY approaches not only save food and money but also instill confidence in your food preservation efforts. Embrace these tips, and you’ll transform your vacuum sealing experience from frustrating to flawlessly effective. What’s your go-to trick for keeping vacuum seals tight?
Frequently Asked Questions
What should I do if my vacuum sealer bag has a tiny hole?
|
Our Picks for the Best Vacuum Sealer in 2026
As an Amazon Associate I earn from qualifying purchases.
|
||
| Num | Product | Action |
|---|---|---|
| 1 | FoodSaver PowerVac Compact Vacuum Sealing Machine Stainless Steel & Black Vertical Storage VS0150 | Preserves freshness reduces bag waste for both dry and wet food |

|
| 2 | Mesliese Vacuum Sealer Machine Powerful 90Kpa Precision 6-in-1 Compact Food Preservation System with Cutter, 2 Bag Rolls & 5 Pre-cut Bags, Widened 12mm Sealing Strip, Dry&Moist Modes (Silver) |
|
| 3 | 95kPa Precision Vacuum Sealer Machine, Double Heat Seal for Dry/Moist Food, Easy-Lock Handle, Built-in Bag Storage & Cutter, Progress Display, Pulse Mode, Removable Drip Tray, Silver |
|
| 4 | Chef Preserve Compact Vacuum Sealer for Food (Vacuum Sealer Machine + 30 Reusable Vacuum Bags) Powerful Handheld Vacuum Sealer Machine, Seal Meal Saver, Portable Food Sealer |
|
| 5 | 90KPa Portable Vacuum Sealer Machine for Food, One-Touch Open Lid, Detachable & Easy to Clean, Vertical Placement Saves Space, Powerful Suction for Freezer Bags & Food Storage |
|
| 6 | NutriChef Food Vacuum Sealer Machine - Automatic Air Sealing System for Dry & Moist Foods, LED Touch Controls, Includes Vacuum Bags, Hose & Wine Stopper, High Suction Power, 14"x6"x3", Silver |
|
| 7 | Food Vacuum Sealer Machine, Powerful & Continuous Vacuum Sealing for Kitchen Storage & Meal Prep, Wet & Dry Food Sealing, Detachable Upper & Lower Design for Easy Cleaning, Includes 50 Bags |
|
| 8 | Nesco Deluxe Food VS-12 Vacuum Sealer, 130 Watts, Kit Bags & Viewing Lid, Compact, Silver |
|
| 9 | FoodSaver Vacuum Sealer Machine, Automatic Bag Detection, Sous Vide Friendly, with sealer bags, roll, handheld vacuum sealer, black |
|
| 10 | Anybear Vacuum Sealer Machine, 90kPa 120W Wide Seal All-IN-1 Powerful Food Storage, Build-in Cutter | Bags Storage | Digital Countdown Display | 2 Bag Rolls and 5pcs Pre-cut Bags (Gray) |
|
For very small punctures, a temporary DIY fix can be applying clear, strong tape over the hole. However, for food safety and long-term preservation, it’s best to transfer the contents to a new, undamaged vacuum sealer bag and re-seal it.
Can I re-use vacuum sealer bags?
It depends. If the bag contained raw meat, fish, or greasy foods, it’s generally not recommended for re-use due to sanitation concerns. Bags that contained clean, dry goods can sometimes be washed, dried thoroughly, and re-used if they are cut open cleanly and are free of any holes or damage. Always inspect them carefully before re-use.
Why do some fruits and vegetables cause bags to puff up even after sealing?
Some fresh produce, like broccoli, cabbage, and certain leafy greens, naturally release gases through a process called respiration. This gas can build up inside a vacuum-sealed bag, causing it to puff up and lose its vacuum. To prevent this, blanch these vegetables before vacuum sealing to deactivate the enzymes responsible for gas production.
How much empty space should I leave in a vacuum sealer bag?
Aim to leave at least 2-3 inches (5-8 cm) of empty space between the food and the top edge of the bag where the seal will be made. This ensures enough room for the machine to effectively draw out air and create a strong, flat, and consistent seal without food interference.
My vacuum sealer isn’t pulling a strong vacuum. What should I check?
First, ensure the bag is positioned correctly and flatly in the vacuum channel. Then, check the rubber gaskets around the vacuum chamber and lid for any cracks, dryness, or debris, as worn gaskets are a common cause of poor suction. Cleaning the vacuum channel and checking for blockages can also help.