A melted or worn Teflon tape on a vacuum sealer can be quickly fixed by following a 7-step DIY replacement process, which typically takes less than 30 minutes. This crucial component, also known as a heat strip or PTFE cover strip, prevents plastic bags from sticking to the hot sealing bar, ensuring airtight seals for food preservation. When the tape malfunctions, it compromises food storage, but replacing it is a straightforward task that restores the sealer’s optimal performance.
Understanding Your Vacuum Sealer’s Teflon Tape
The Teflon tape plays a pivotal role in the vacuum sealing process. It’s a thin, heat-resistant barrier placed between the heating element (seal wire) and the vacuum bag. Its primary function is to prevent the plastic bag material from directly sticking to or melting onto the hot sealing bar during the heat-sealing cycle. Without this protective layer, the intense heat generated by the sealing wire would adhere the bag to the machine, making it impossible to create a clean, consistent, and airtight seal.
This tape is typically made from polytetrafluoroethylene (PTFE), a synthetic fluoropolymer known for its excellent non-stick properties and high heat resistance. Over time and repeated use, even this durable material will eventually show signs of wear. Its integrity is critical not only for effective sealing but also for protecting the underlying heating elements from damage, ensuring the longevity and consistent performance of your vacuum sealer. For expert home food reviews on this site.
Why Does Vacuum Sealer Teflon Tape Melt or Wear Out?
Several factors can contribute to the degradation or melting of your vacuum sealer’s Teflon tape, ranging from normal operational wear to improper usage. The most common culprit is often an excessive sealing time setting. When the heat bar operates at a higher temperature or for a longer duration than necessary, it subjects the Teflon tape to intense, prolonged heat, causing it to burn through or melt prematurely.
Beyond incorrect settings, general wear and tear from consistent use is inevitable. Each sealing cycle involves the heating element pressing against the tape, gradually eroding its protective qualities. Over time, the hot wire beneath the tape can literally burn through the material. Failure to replace the tape in a timely manner after initial signs of wear can exacerbate the problem, leading to further damage to the sealing wires and even the underlying components of the heat bar.
Another significant factor is the accumulation of food particles, oils, or other debris on the seal bar. These residues create hot spots and uneven surfaces, causing the tape to wear down inconsistently or melt in specific areas. Additionally, a damaged sealing wire underneath the tape can lead to concentrated heat and burn marks, indicating a need for both wire and tape replacement. Sometimes, foreign objects or even just a crumpled bag stuck under the tape can create lumps or uneven pressure, accelerating wear and leading to melting in localized spots.
Recognizing When to Replace Your Teflon Tape
Identifying a worn or melted Teflon tape early is crucial for maintaining your vacuum sealer’s efficiency and preventing further damage to the appliance or your food. One of the most obvious signs is the presence of burn marks or dark spots directly on the tape. These discolored areas show where the heat has become too intense, compromising the tape’s protective layer.
You might also notice the tape peeling, lifting, fraying, or developing a rough texture. These physical changes indicate that the adhesive is failing or the material itself is deteriorating, no longer providing a smooth, non-stick surface. A tell-tale sign of a compromised tape is when plastic bags start to stick to the sealing bar during or after the sealing process. This means the non-stick property of the Teflon is gone, and the bag is making direct contact with the hot element.
The quality of your seals will also decline. Uneven or weak seals, or bags that fail to maintain a vacuum and don’t close properly, are strong indications that the Teflon tape is no longer performing its job effectively. If you repeatedly observe an imperfection in the seal that consistently appears in the same spot on your sealed bags, it’s highly likely that the Teflon tape at that specific location is damaged. Finally, if you accidentally touch the heat bar after sealing and find that an exposed area is excessively hot – beyond the normal warmth – it suggests the tape is no longer adequately covering the heating element. Addressing these signs promptly will restore your sealer’s functionality and prevent food spoilage.
Step-by-Step Guide: Replacing Melted Teflon Tape
Replacing the Teflon tape on your vacuum sealer is a simple repair that can significantly extend the life of your machine. Follow these steps carefully to ensure a quick and effective replacement.
Tools and Materials You Might Need:
- Replacement Teflon tape (matching width and length)
- Small screwdriver (Phillips or flathead, depending on your model)
- Clean cloth or paper towels
- Rubbing alcohol (isopropyl alcohol) or acetone
- Gloves (optional, for cleaning)
Step 1: Prioritize Safety by Unplugging Your MachineBefore you begin any maintenance, always ensure your vacuum sealer is completely powered off and unplugged from the electrical outlet. This is a critical safety measure to prevent accidental electrocution or activation of the heating element during the repair.
Step 2: Carefully Remove the Old, Damaged Teflon TapeLocate the sealing bar within your vacuum sealer where the Teflon tape is positioned. Gently peel away the old, melted, or worn-out Teflon tape from one end. It should come off much like an old piece of adhesive tape. Be careful not to damage any underlying components, such as the heating wire, as you remove it. In some models, there might be a secondary strip of tape underneath the heating element; note its position if present.
Step 3: Thoroughly Clean the Seal Bar AreaAfter removing the old tape, you will likely find adhesive residue, food particles, grease, or other debris on the seal bar. It is essential to clean this area meticulously. Use a clean cloth or paper towel dampened with rubbing alcohol or acetone to wipe away all traces of residue. Ensure the surface is perfectly clean and dry before applying new tape, as any remaining grime can prevent the new tape from adhering properly and create hot spots. Also, inspect the heating element (the wire) to ensure it is intact, straight, and free of bends or damage.
Step 4: Inspect the Heating ElementWith the Teflon tape removed, you have a clear view of the heating element. Take this opportunity to inspect it for any cracks, breaks, or buckling. If the heating wire itself is damaged, replacing only the Teflon tape will not resolve your sealing issues. In such cases, the heating element will also need to be replaced, which can be a separate procedure often requiring specific parts for your model.
Step 5: Apply the New Teflon TapeUnroll a section of your new Teflon tape. If you purchased a roll, cut it to the appropriate length, matching the old tape or the length of your seal bar. The new tape will typically have an adhesive backing, often protected by a yellow liner. Peel off a small section of this backing, about two inches, from one end.
Carefully align the new tape with the edge of the seal bar. Begin by firmly pressing down the exposed adhesive end onto the clean seal bar. Gradually peel back more of the backing while simultaneously applying gentle tension and pressing the tape down smoothly along the length of the bar. The goal is to lay the tape down straight, taut, and without any wrinkles, bubbles, or folds. Smooth it out with your fingers as you go to ensure even adherence.
Step 6: Address Any Accessory Components (if applicable)Some vacuum sealers have bag clips or other small components that attach to the seal bar. If you removed such clips in Step 2, you might need to use the old tape as a template to poke holes through the new Teflon tape where these clips screw in. Once the tape is fully secured, reattach any such accessories.
Step 7: Reassemble and Test Your Vacuum SealerOnce the new Teflon tape is securely in place and any removed components are reattached, you can reassemble any covers or parts you might have taken off the sealing bar assembly. Plug your vacuum sealer back into the power outlet. Perform a test seal with an empty vacuum bag to ensure that the new tape is functioning correctly and producing a strong, consistent, airtight seal. This quick test confirms your repair was successful.
> “The cleanliness of your seal bar is paramount. Any debris acts like a microscopic hot spot, accelerating tape wear and compromising your seal quality.” – Admin, ReviewingTV.com, Vacuum Sealer Technician with 10+ years experience.
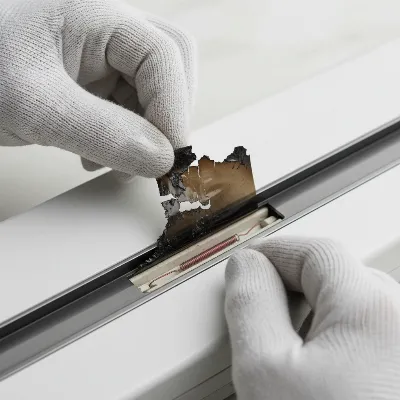 A person's hands carefully peeling off old, burnt Teflon tape from a vacuum sealer's heat bar, showing the exposed heating element underneath.
Choosing the Right Replacement Teflon Tape
Selecting the correct replacement Teflon tape is crucial for ensuring the longevity and performance of your vacuum sealer. The most important factors are the width and length of the tape. Different vacuum sealer models and brands will require varying dimensions to fit their specific seal bars. It’s advisable to measure your old tape or consult your vacuum sealer’s user manual to determine the exact width and the minimum length required.
Most replacement Teflon tapes come in self-adhesive rolls. These rolls allow you to cut the precise length needed for your machine, making them a versatile and cost-effective option. When purchasing, look for high-quality PTFE-coated adhesive tape that is specifically designed for heat-sealing applications. While generic options are widely available, opting for a reputable supplier or even contacting your vacuum sealer’s manufacturer for their recommended replacement parts can ensure better compatibility and durability. Some manufacturers even offer custom-cut lengths if you have a less common machine size. Investing in good quality tape will prevent premature wear and maintain consistent sealing performance.
Essential Tips to Prevent Future Teflon Tape Damage
Preventing future damage to your vacuum sealer’s Teflon tape is far easier and more cost-effective than frequent replacements. Implementing a few simple maintenance habits and operational adjustments can significantly extend its lifespan.
Firstly, always use the minimum possible seal time setting that still achieves an effective, airtight seal. Over-sealing subjects the Teflon tape to unnecessary prolonged heat exposure, which is a primary cause of melting and wear. Experiment with different settings to find the optimal balance for your bags and food types.
Regular cleaning of the seal bar is paramount. After each use, especially when sealing oily or saucy foods, gently wipe the seal bar with a damp cloth. Food particles and invisible oils can accumulate and create hot spots or uneven surfaces, which accelerate tape wear. For stubborn residues, a soft cloth with isopropyl alcohol can effectively remove oils without damaging the Teflon coating. However, avoid abrasive cleaners or harsh scrubbing pads, as these can scratch and compromise the non-stick surface of the tape.
Furthermore, always ensure you are sealing clean and dry bags. Attempting to seal bags with moisture or debris on the sealing area can lead to inconsistent seals, contamination of the heat bar, and increased wear on the Teflon tape. Similarly, avoid applying excessive pressure on the lid during the sealing cycle, as this can unnecessarily stress the tape and other components.
Periodically, during cleaning, take a moment to inspect the Teflon tape for any early signs of wear, such as minor discolouration, rough patches, or slight peeling. Early detection allows for timely replacement, preventing further damage to the heating element or seal bar. Additionally, when storing your vacuum sealer, it’s often recommended to leave the lid slightly ajar. This prevents constant compression of the gaskets, which, while not directly related to the Teflon tape, impacts overall sealing performance and longevity of the machine. By adhering to these simple practices, you can dramatically increase the lifespan of your Teflon tape and ensure your vacuum sealer remains a reliable kitchen companion.
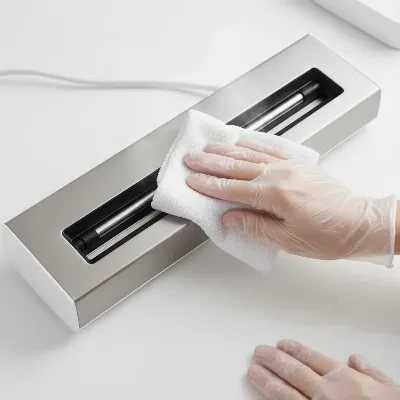 A person wiping the clean, silver heat bar of a vacuum sealer with a soft white cloth, emphasizing preventative maintenance.
Common Issues After Tape Replacement and Troubleshooting
Even after replacing the Teflon tape, you might encounter a few minor issues. Knowing how to troubleshoot them can save you time and frustration.
One common problem is the machine failing to create a consistent or strong seal. If this occurs, first re-check the newly installed Teflon tape. Ensure it is perfectly flat, taut, and free of any wrinkles, bubbles, or debris underneath. Even a small imperfection can compromise the seal. Also, verify that the tape is the correct width and length for your specific model, covering the entire heating element adequately.
Another issue could be that the plastic bags are still sticking to the heat bar. This indicates that the non-stick property isn’t fully effective, which might be due to a poor-quality replacement tape or insufficient cleaning of the seal bar beforehand. If the tape is new and correctly installed, ensure no sticky residue was left behind from the old tape that could be affecting its performance. A thorough cleaning with isopropyl alcohol should resolve this.
Sometimes, after replacement, the machine might not heat up at all, or you might notice burn marks reappearing quickly on the new tape. If there’s no heat at all, the problem might not have been the Teflon tape initially. Instead, it could be a damaged heating element (the wire itself), a loose connection, or an issue with the machine’s internal circuitry. If burn marks reappear quickly, re-evaluate your sealing time settings; they might still be too high. Also, double-check that the heating element is not buckled or broken, as a damaged element can cause localized overheating. In such cases, further inspection of the heating element or professional repair might be necessary.
If the machine is making excessive noise or performing unusually, this is less likely to be directly related to the Teflon tape but could indicate broader mechanical issues. Always refer to your vacuum sealer’s user manual for specific troubleshooting steps and contact the manufacturer’s support if you suspect a more serious underlying problem.
Conclusion
A well-maintained vacuum sealer is a cornerstone of efficient food preservation, and the humble Teflon tape plays an indispensable role in its operation. While a melted or worn Teflon tape can seem like a daunting problem, it’s a remarkably quick and simple fix that anyone can perform. By understanding why this essential component wears out, recognizing the tell-tale signs of damage, and following our straightforward step-by-step replacement guide, you can quickly restore your vacuum sealer to peak performance. Beyond just fixing the issue, adopting preventative measures like proper cleaning and mindful sealing practices will significantly extend the life of your new Teflon tape and, by extension, your entire appliance. Don’t let a small piece of tape compromise your food storage; take action to ensure your vacuum sealer continues to provide reliable, airtight seals. What other small maintenance tasks do you find most impactful for your kitchen appliances?
Frequently Asked Questions
How often should I replace the Teflon tape on my vacuum sealer?
|
Our Picks for the Best Vacuum Sealer in 2026
As an Amazon Associate I earn from qualifying purchases.
|
||
| Num | Product | Action |
|---|---|---|
| 1 | 90KPa Portable Vacuum Sealer Machine for Food, One-Touch Open Lid, Detachable & Easy to Clean, Vertical Placement Saves Space, Powerful Suction for Freezer Bags & Food Storage |

|
| 2 | FoodSaver PowerVac Compact Vacuum Sealing Machine Stainless Steel & Black Vertical Storage VS0150 | Preserves freshness reduces bag waste for both dry and wet food |
|
| 3 | Chef Preserve Compact Vacuum Sealer for Food (Vacuum Sealer Machine + 30 Reusable Vacuum Bags) Powerful Handheld Vacuum Sealer Machine, Seal Meal Saver, Portable Food Sealer |
|
| 4 | Food Vacuum Sealer Machine, Powerful & Continuous Vacuum Sealing for Kitchen Storage & Meal Prep, Wet & Dry Food Sealing, Detachable Upper & Lower Design for Easy Cleaning, Includes 50 Bags |
|
| 5 | 95kPa Precision Vacuum Sealer Machine, Double Heat Seal for Dry/Moist Food, Easy-Lock Handle, Built-in Bag Storage & Cutter, Progress Display, Pulse Mode, Removable Drip Tray, Silver |
|
| 6 | Mesliese Vacuum Sealer Machine Powerful 90Kpa Precision 6-in-1 Compact Food Preservation System with Cutter, 2 Bag Rolls & 5 Pre-cut Bags, Widened 12mm Sealing Strip, Dry&Moist Modes (Silver) |
|
| 7 | NutriChef Food Vacuum Sealer Machine - Automatic Air Sealing System for Dry & Moist Foods, LED Touch Controls, Includes Vacuum Bags, Hose & Wine Stopper, High Suction Power, 14"x6"x3", Silver |
|
| 8 | Nesco Deluxe Food VS-12 Vacuum Sealer, 130 Watts, Kit Bags & Viewing Lid, Compact, Silver |
|
| 9 | FoodSaver Vacuum Sealer Machine, Automatic Bag Detection, Sous Vide Friendly, with sealer bags, roll, handheld vacuum sealer, black |
|
| 10 | Anybear Vacuum Sealer Machine, 90kPa 120W Wide Seal All-IN-1 Powerful Food Storage, Build-in Cutter | Bags Storage | Digital Countdown Display | 2 Bag Rolls and 5pcs Pre-cut Bags (Gray) |
|
The frequency depends heavily on your usage. For occasional home use, it might last for years. For frequent or heavy use, inspect it every few months or whenever you notice signs of wear like burn marks, peeling, or inconsistent seals. Regular checks are key.
Can I use any type of tape as a replacement for Teflon tape?
No, it is crucial to use only genuine PTFE-coated Teflon tape designed for heat-sealing applications. Regular adhesive tapes cannot withstand the high temperatures of the sealing bar and will melt, creating a messy and ineffective seal, potentially damaging your machine.
What happens if I don’t replace melted Teflon tape?
Ignoring melted or worn Teflon tape can lead to poor, inconsistent, or non-existent seals, compromising food preservation. It can also cause plastic bags to stick to the heating element, potentially damaging the element itself or even the seal bar, leading to more costly repairs.
Is it possible to clean and reuse old Teflon tape?
No, once Teflon tape shows signs of melting, burning, or significant wear (like peeling or rough spots), its protective and non-stick properties are compromised. Attempting to clean and reuse it will likely result in continued poor sealing performance and could further damage your machine. It should always be replaced.
Where can I buy replacement Teflon tape for my vacuum sealer?
Replacement Teflon tape can be purchased from appliance parts stores, online retailers specializing in vacuum sealer supplies, or directly from your vacuum sealer’s manufacturer. Ensure you get the correct width and length for your specific model.
Frequently Asked Questions
How often should I replace the Teflon tape on my vacuum sealer?
The frequency of Teflon tape replacement depends on usage. For occasional home use, it may last for years, but for frequent use, inspect it every few months. Look for signs of wear like burn marks, peeling, or inconsistent seals to determine if replacement is needed.
Can I use any type of tape as a replacement for Teflon tape?
No, it is crucial to use only genuine PTFE-coated Teflon tape specifically designed for heat-sealing applications. Regular adhesive tapes cannot withstand the high temperatures of the sealing bar and will melt, leading to ineffective seals and potential machine damage.
What happens if I don't replace melted Teflon tape?
Ignoring melted or worn Teflon tape can result in poor, inconsistent, or non-existent seals, compromising food preservation. It can also cause plastic bags to stick to the heating element, potentially damaging the element itself or the seal bar, leading to more costly repairs.
Is it possible to clean and reuse old Teflon tape?
No, once Teflon tape shows signs of melting, burning, or significant wear, its protective and non-stick properties are compromised. Attempting to clean and reuse it will likely result in continued poor sealing performance and could further damage your machine, so it should always be replaced.
Where can I buy replacement Teflon tape for my vacuum sealer?
Replacement Teflon tape can be purchased from appliance parts stores, online retailers specializing in vacuum sealer supplies, or directly from your vacuum sealer's manufacturer. Ensure you obtain the correct width and length for your specific model to ensure proper fit and function.
Replace Melted Vacuum Sealer Teflon Tape
This guide provides a step-by-step process to replace the melted or worn Teflon tape on your vacuum sealer, restoring its sealing efficiency.
Always ensure your vacuum sealer is completely powered off and unplugged from the electrical outlet before starting any maintenance. This critical safety measure prevents accidental electrocution or activation of the heating element during the repair process.
Locate the sealing bar and gently peel away the old, melted, or worn-out Teflon tape from one end. Be careful not to damage any underlying components like the heating wire. Note the position of any secondary tape strips if present.
After removing the old tape, meticulously clean the seal bar area to remove adhesive residue, food particles, or grease. Use a clean cloth dampened with rubbing alcohol or acetone to ensure the surface is perfectly clean and dry before applying new tape, which prevents hot spots and ensures proper adhesion.
Cut the new Teflon tape to the appropriate length, matching the old tape or the seal bar. Peel off about two inches of the adhesive backing and carefully align the new tape with the edge of the seal bar. Press it down smoothly, gradually peeling back more backing while applying gentle tension to avoid wrinkles or bubbles.
Once the new Teflon tape is securely in place and any removed components are reattached, reassemble any covers. Plug your vacuum sealer back into the power outlet and perform a test seal with an empty vacuum bag. This confirms the new tape is functioning correctly and producing a strong, consistent, airtight seal.
Get our weekly buyer guide
Practical specs, not advice. Unsubscribe anytime.

I was so frustrated with my vacuum sealer leaving incomplete seals, and I thought I’d have to buy a whole new machine. Following the steps to replace the PTFE cover strip was a game-changer. It really did only take about 30 minutes, and now my bags are sealing perfectly again. So glad I found this before tossing my old sealer!
This was exactly what I needed! My vacuum sealer was melting the plastic bags, and I couldn’t figure out why. Turns out, my Teflon tape was completely shot. The detailed guide on replacing it made the process super simple. Now I can go back to freezing my garden produce without worrying about freezer burn.
My FoodSaver started having issues where the bags would stick to the heating element, making a mess and wasting bags. I didn’t realize the Teflon tape was even a replaceable part! The instructions were clear, and it was pretty easy to swap out. I wish I had known about this sooner, but at least my food preservation is back on track.
I tried replacing the heat strip on my older model, and while the steps were easy to follow, getting the old sticky residue off was a bit of a pain. It definitely took me longer than 30 minutes because of that. The new tape is working, but I wish there was a tip for cleaning the bar more easily. Still, it saved me from buying a new sealer.